I wanted to experiment with the simplist form of melting - melting ice. I like the shape of the half melted ice but I didnt find the process as interesting as working with the felt and plactic.
Monday, 23 January 2012
Friday, 20 January 2012
Experiment 3 - Circles
I wanted to see if in a smaller, circular shape would the materials ccontort more. Both the felt and plastic curved and bended in this state.

After burning the felt and plastic circles I decided to hang them together. I like how the light comes through the plastic. I would like to do more and I am not happy with the location.
I wanted to experiment more with the circles - this time using different colours and a differernt stitch. I also combined buring and tearing to destroy it. I like the combined the result.
Thursday, 19 January 2012
Experiment 2
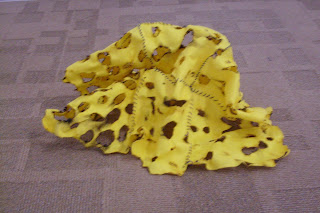
Developing from my experimentation of burning felt I decided to try it on a larger scale - joining multiple patches together by hand embroidered stitching in a contrasting colour to add an interesting detail to the sculpture. I picked the grid pattern to distinguish the different burnt areas. I like how the fabric distorted in shape and the burns stand out against the yellow colour.
The burnt felt in interesting as a sculpture as you can see through the different holes. With more time I would've liked to have made a larger version but the stitching and burning take up a lot of time.
Tuesday, 17 January 2012
Burn, burn, burn
As I found the verbs of burning and melting interesting, I decided my first sculptural experiment should be burning and melting different materials. I burned paper, card, cardboard, wood, cotton fabric, sponge, plastic bag, clingfilm, plastic covering, fruit netting, laminating plastic plastic cups and felt.
When the laminating plastic burned it melted and contorted and an interesting pattern was created changing the cloudy surface clear in the areas the flame touched.
The felt fabric signed and burned away. I found the brown/ black colour change really intriguing due to the colour contrast of the yellow. When burned sligthly, some fibres remained across the hole in a unusual pattern.
I think I want to keep experimenting withe the laminating plastic, plastic cups and felt.
Monday, 16 January 2012
Elective 1 - Sculpture!
Today I started sculpture. We recieved our brief which was to investigate our relationship with the five senses (sight, smell, hearing, touch, taste) or our vital senses (temperature, respiration, blood pressure). Large brown sheets were layed out on the floor and each topic was brainstormed by everyone in the class. Any and all thoughts to do with the topics were written down. At this stage the area of respiration and blood pressure intrguied me. After this a second round of sheets were layed downa nd we had to write verbs or doing words to do with the topics. This helped to formulated options for sculptural processes. I then became more interested in the area of temperature as I found the verbs assoicated with that (burning, melting) more intriguing. Day one done and I'm liking sculpture so far, though I find it a little abstract, but I'm intersted to see how the project goes and what I will learn.
Saturday, 7 January 2012
The END! ... for now
So this will be my final post for the movement and motion project of first semester. I have learned alot throughout this project and cant wait to get started in the specialisations I have chosen : visual communication, fashion and sculpture. I hope you liked looking through my blog, I found it a really good way to keep track of my work. To finish off here is a picture of a collage I made of recent photos I took for the project. As always let me know what you think!:
Sparkler Sculpture
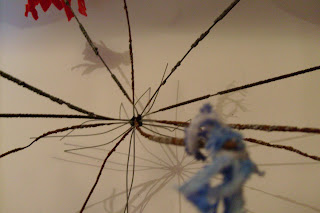
This is a sculpture inspired by the sparklers. I made it using the actual sparklers after they were used/ burned. I added fabric, thread and wire to the tops of some of the sticks to resemble lit sparklers. I think the orange thread works best , while the red fabric inst successful in portraying a sparkler. I also think the shadows created in the photo are interesting too. I was happy with the sculpture as it is a little abstract but also resembles my project.
Let me know what you think!:
Sewing Sparklers
I wanted to show the sparklers in a different medium and I also wanted to show my interest in fashion - the answer : working with fabric. I thought the sparkler photos resembled embroidery, so that s the direction I went in. For the negative photo, I used a blue mix multi coloured thread and blue textured wool on white cotton. For the regular sparklers, I used orange/yellow/red mix thread, orange, yellow and white paint and gold beads. I like the result though they look better in person than in the photos.
Let me know what you think! :
 |
| Blue negative embroidery |
 |
| Photo inspiration |
 |
| Sparkler embroidery |
 |
| Detail |
 |
| Photo inspiration |
Sparklers!
I foung using the sparklers as a light source to be interesting so I experimented more with them. Different types of sparklers resulted in different effects. I enjoyed experimenting with them.
Let me know what you think! :
LIGHTS, Camers, Action!
Just some videos I made using small battery powered LED lights to show the movement of light. Flashing lights warning!. Let me know what you think! :
Tuesday, 3 January 2012
Photoshop
I worked on photo shop to crop one of my sparkler images, make it negative, blow it up and print it really big in the print room - I was really happy with the result. Let me know what you think! :
Sparklers Typography
While working with the sparklers some of the gestural movements ended up looking like letters of the alphabet (ie: O and S). So i made an attempt at the whole alphabet. This proved to be very difficult with some letters so I only showed the successful ones here. It was really fun doing this, trying to get all the letters. Let me know what you think! :
 |
| A |
 |
| B |
 |
| C |
 |
| D |
 |
| H |
 |
| L |
 |
| O |
 |
| P |
 |
| S |
Ink Experimentation
Different Mediums
Paint for the LED rope :
Pastels for the spinning top:
Paper, tinfoil, ribbon, glue and wool for the crosshatching effect of the layers:
Subscribe to:
Comments (Atom)


